
Instructions for Use
0010181 REV A / United States Only
Trade Name
CoapTech PUMA-G System
Common Name
Percutaneous Ultrasound Gastrostomy (PUG) System
Intended Use
To aid in percutaneous access to the stomach during gastrostomy tube placement.
Indications for Use
The CoapTech PUMA-G System (PUMA-G) is intended to affix the stomach to the anterior abdominal wall facilitating the initial percutaneous placement of a gastrostomy feeding tube in adults only.
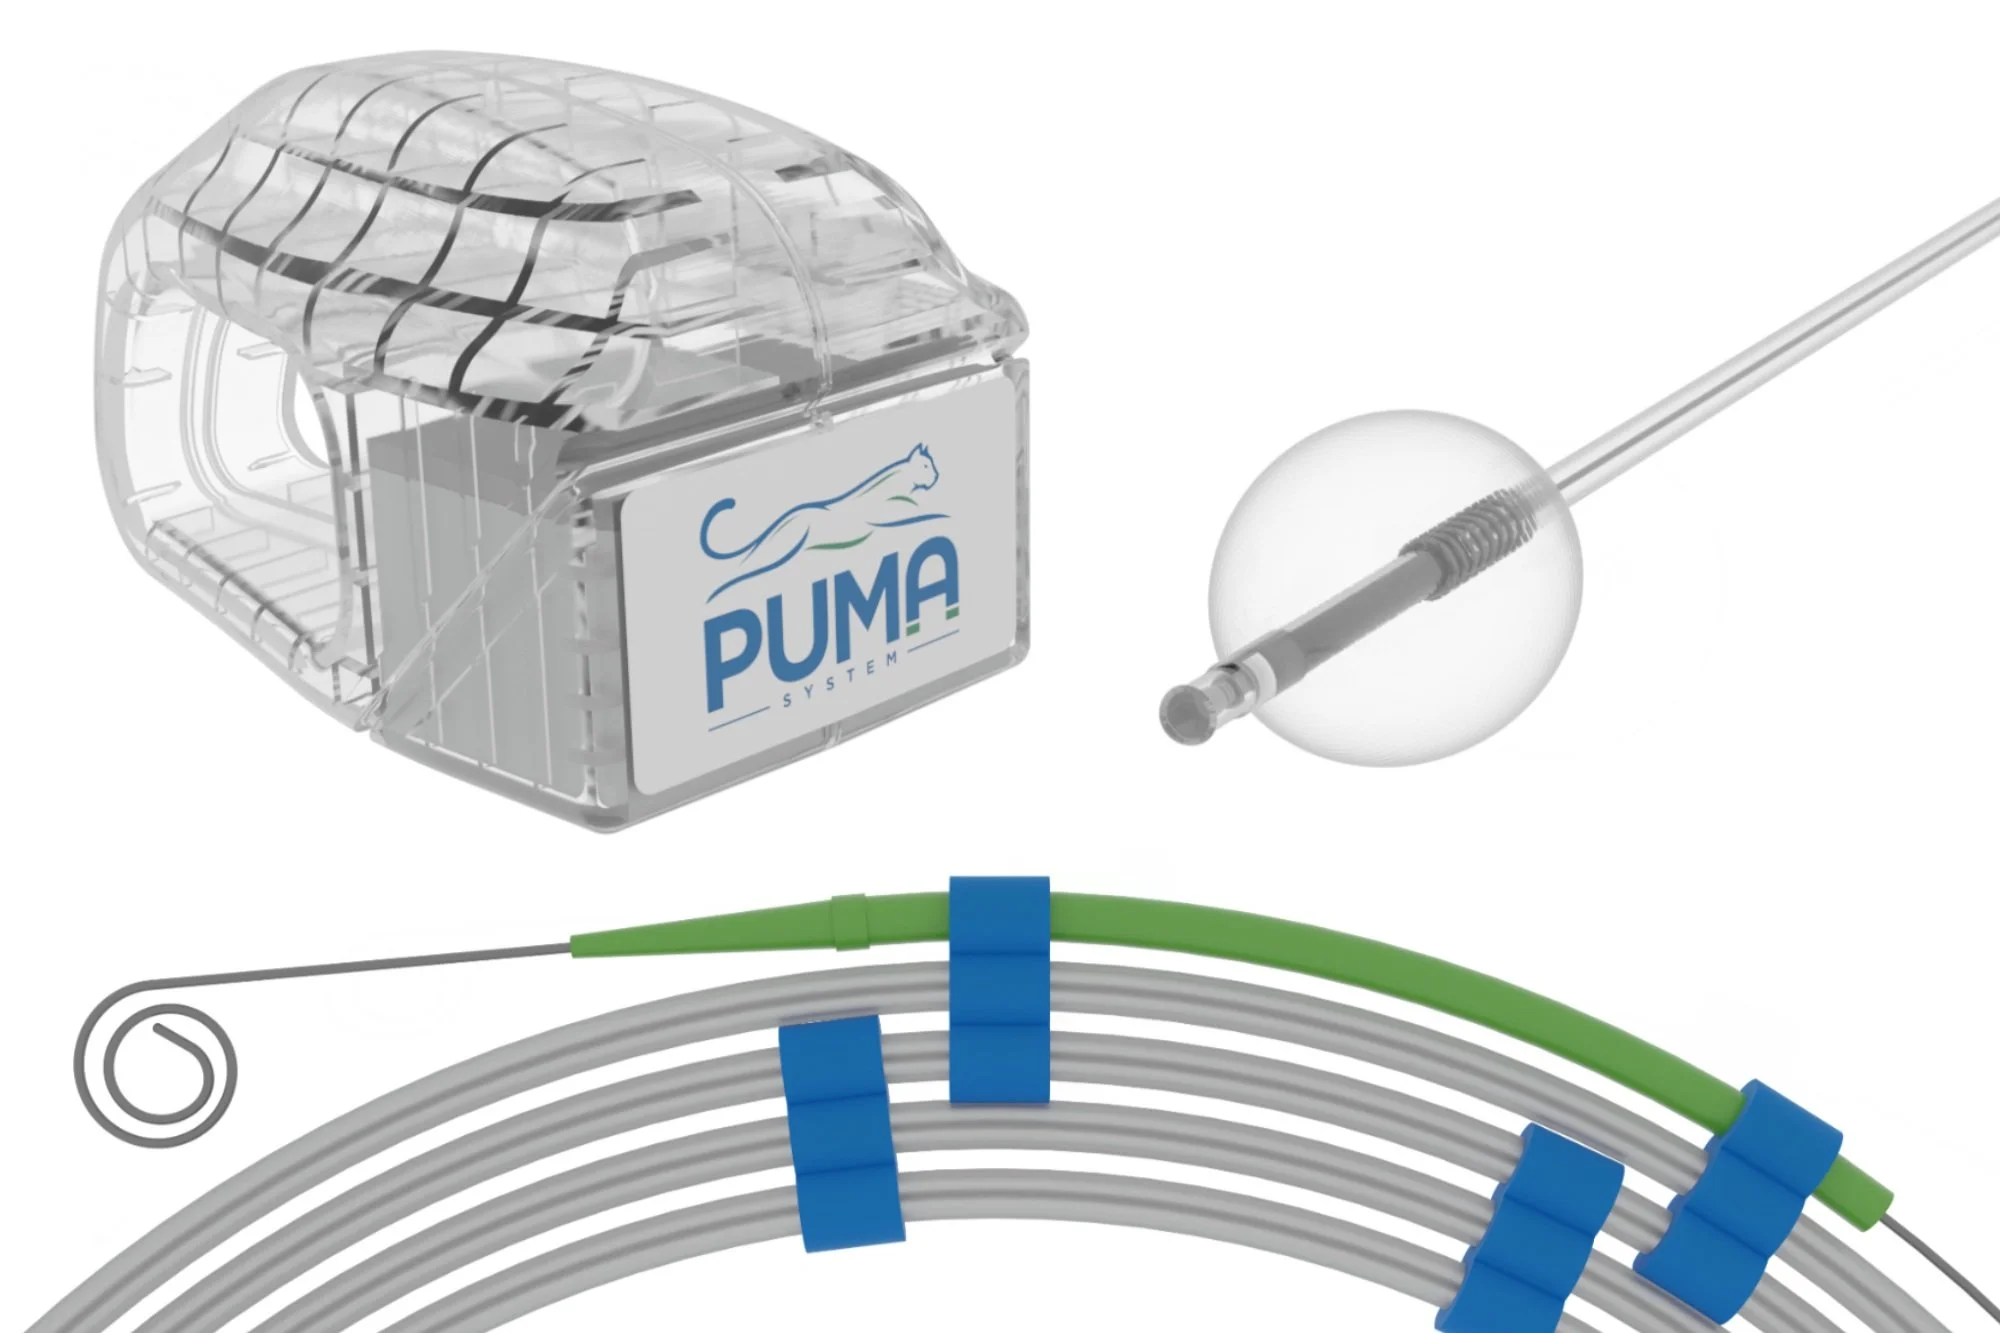
PUG System Kit Contents
1 Balloon Catheter
1 Guidewire
3 Equipment Cover (with sterile gel)
1 Trauma Shears
1 Needle (18G, 7cm)*
1 Needle (18G, 9cm)*
1 Plastic Bowl
1 Chloroprep
1 60mL Syringe
2 10mL Syringes (Luer-Lock and Slip-Tip)
1 Lube Jelly Pack
1 Adult Bite Block
1 Rectangular Tray
1 Sterile Water Cup
1 Food Coloring Pack
1 Instructions for Use
Handheld Magnet (sold separately)
1 20F PUSH PEG Kit (Standard or Safety)
Optional: 1 Procedural Drape
* Extra needle (18G, beveled), for abort scenario requiring removal of guidewire.
Notes
Do not use this device for any purpose other than the stated intended use.
Verify the expiration date on the package label prior to using the product. If the expiration date has lapsed, do not use the device.
The internal catheter and guidewire are single use, where reuse of these components could lead to contamination.
The handheld magnet should be examined prior to use to ensure that no breaks or fractures have occurred (e.g., from a drop) that could impact the performance of the magnet.
Store handheld magnet in its case, away from temperature extremes and other magnetic material.
Dispose of balloon catheter and guidewire with medical waste, according to hospital policies. Do not dispose magnetic component (balloon catheter) in sharps containers.
Contraindications
Contraindications associated with use of the PUMA-G include patients with pacemakers or other active implantable or metallic devices, where exposure to magnetic elements in the system could impact pacemaker functionality. Other contraindications are similar to gastrostomy tube placement, including (but not limited to): colonic interposition; portal hypertension; gastric varices; aspiration pneumonia; morbid obesity; abnormal upper gastrointestinal anatomy – including but not limited to an esophageal stricture or any other medical condition that would result in a gastric deformity; sepsis; severe gastroesophageal reflux; ascites; or diffuse inflammatory, infectious, or neoplastic disease involving the walls of the abdomen or anterior stomach, gastrointestinal obstruction or proximal small bowel fistulae. NOTE: patients with cirrhosis have an increased risk of developing ascites, which is a contraindication to gastrostomy placement.
Potential Complications
Potential complications associated the PUMA-G are similar to percutaneous endoscopic gastrostomy (PEG) and gastrostomy tubes. Potential complications include (but are not limited to): bronchopulmonary aspiration and pneumonia, pulmonary injury, respiratory distress or airway obstruction, peritonitis or septic shock, colocutaneous, gastrocolocutaneous or small bowel fistula, gastric dilatation, sigmoid intra-abdominal herniation and volvulus, persistent fistula following gastrostomy removal, esophageal injury, necrotizing fasciitis, cellulitis, improper placement or inability to place gastrostomy tube, tube dislodgement or migration, hemorrhage, and tumor metastasis. Additional complications include (but are not limited to): pneumoperitoneum, peristomal wound infection and purulent drainage, stomal leakage, bowel obstruction, gastroesophageal reflux (GERD), and blockage or deterioration of the gastrostomy tube.
WARNING: Any patient with any intrabdominal surgical history should be evaluated to confirm that the upper GI tract is normal prior to attempting gastrostomy tube placement using the PUMA-G System.
Precautions
The PUMA-G System enables gastrostomy tube placement by the percutaneous ultrasound gastrostomy (PUG) method. PUG should be performed only by physicians credentialed in ultrasound and trained in ultrasound-guided gastrostomy. Sedation should be administered only by physicians with training commensurate with the level of sedation needed. The benefit of gastrostomy tube placement must be weighed against the risks associated with an indwelling gastrostomy feeding tube.
The PUMA-G System is intended only for adults, 22 years of age and older.
The PUMA-G System is intended for patients with abdominal wall thickness of 4.5cm or less, which approximately correlates to a body-mass index (BMI) of 30, depending on habitus.
WARNING: Abdominal wall thickness should be assessed pre-procedure to determine if the patient is a candidate for this device/procedure.
In the event that the device performance changes or fails, abort the procedure and contact CoapTech.
The PUG system uses magnets to achieve its function, and therefore precautions should be taken to limit ferromagnetic material in the environment during use. Patients with pacemakers or other electrical or metallic devices are contraindicated.
WARNING: The PUMA-G System is MR Unsafe. Do not use the PUMA-G System in MR environments.

Instructions for Use
STOP if any contraindications to percutaneous gastrostomy or magnetic fields (such as a pacemaker) are present.
Insert a temporary feeding tube using standard gastric tube insertion technique(s) and confirm placement below the ribs with auscultation. If unable to complete, STOP.
Remove the balloon catheter from sterile packaging. Approximate insertion length by measuring the catheter from nose to earlobe to xiphoid process, or estimate distance by existing NG/OG tube(s). Lubricate the catheter liberally. Insert the catheter orally using standard gastric tube insertion technique(s). Typical insertion length of 50-55cm provides enough length to reach the stomach and provide sufficient slack for the balloon to respond to magnetic forces. If sensing resistance during insertion, STOP. Once completed, remove the inner stylet.
WARNING: Unexpected resistance encountered during balloon catheter placement could indicate an undiagnosed upper GI anatomical anomaly. Discontinue PUMA-G System use if unexpected resistance is found.
Prepare the site according to the surgical guidelines of your institution.
Prep the handheld magnet by placing it in a sterile drape or transducer cover.
Confirm catheter placement in stomach by moving the handheld magnet along the abdomen below the ribs and feeling for coaptation with the balloon catheter (i.e. trans-cavity magnetic attraction and alignment). If coaptation is not obvious, fill the balloon (approximately 30-35mL) with blue dyed sterile water or saline and attempt to find the balloon catheter by ultrasound. Insufflation at this point can also help achieve coaptation. If unable to achieve coaptation or confirm by ultrasound, STOP. NOTE: time under coaptation is expected to be less than 10 minutes.
NOTE: The haptic feedback felt during coaptation results from the magnetic interaction. The sensation is like any magnetic interaction – for instance, sticking a magnet on a refrigerator. This haptic feedback will be stronger in thin patients and weaker in obese patients, because the magnetic force decreases with distance.
Insufflate the stomach with air using the preplaced temporary gastric tube. If unable to appropriately insufflate, STOP.
If the balloon has not been inflated under prior steps, infuse approximately 30-35mL of blue dyed sterile water or saline into the balloon catheter. If needed, first gently aspirate the balloon catheter to remove air from the balloon. NOTE: adding more than 35mL of fluid into the balloon catheter will impact optimal visualization and targeting.
Use ultrasound to visualize the balloon. To enhance visualization, agitate the fluid by pressing repeatedly on the external tubing or pumping the syringe (up to 5mL of fluid in and out). If unable to visualize the balloon on ultrasound, STOP.
Determine the best target location for gastrostomy tract formation (skin to gastric wall), make minor adjustments to balloon location using the handheld magnet, as needed. Verify with ultrasound that no bowel, viscera or vessels are overlaying the stomach at the planned gastrostomy tract. Note the balloon depth on ultrasound to estimate the gastrostomy tract length. Record the planned tract length (abdominal wall thickness) for use when placing the gastrostomy tube. If unable to identify a safe tract site, STOP.
Inject local anesthetic at the planned gastrostomy site if needed for patient comfort. Create a gastrostomy tract using an access needle attached to a syringe. Under real-time ultrasound guidance, advance the needle to target the balloon’s center while gently aspirating. Confirm placement in balloon by aspirating blue dyed water or saline into the syringe. If unable to aspirate, STOP.
WARNING: Advance the needle slowly to avoid the risk of perforating the posterior stomach (i.e., inserting the needle too far).
Hold the access needle in position while removing the syringe.
Insert pigtail end of guidewire into the access needle. To achieve this, pull the guidewire back into the feeder tip, which will temporarily straighten the guidewire tip. Insert until resistance is relieved, or approximately 5 cm beyond the needle (10-12 cm total). If excessive resistance is present, STOP.
Gently remove the needle, leaving the guidewire in place.
Deflate the balloon by aspirating all fluid from the external port.
Remove the handheld magnet and place it safely away from the patient and other magnetic material.
Gently advance the guidewire while simultaneously retracting the balloon catheter from the mouth. This should be done slowly and at equal rates (as much as possible). Upon completion of this step, the pigtail guidewire tip will have exited the mouth with the balloon catheter, with the other end of the guidewire exiting via the gastrostomy tract. If coupling of the guidewire and balloon is lost during this process, remove the guidewire from the stomach and STOP.
In order to push the gastrostomy tube over the guidewire, cut off the pigtail end of the guidewire at the darkened section. Discard the pigtail and balloon catheter. CAUTION: cutting outside the darkened region could cause unraveling of the guidewire.

19. Follow standard percutaneous gastrostomy PUSH (Sachs-Vine) technique, with gastrostomy PUSH kit. Insert the chosen gastrostomy tube per its own instructions for use.
20. In situations where coaptive ultrasound has identified a safe gastrostomy tract region, and the PUSH technique is ultimately not feasible or fails, gastrostomy tube placement may be completed using gastropexy. Using a gastropexy kit, place gastropexy anchors followed by standard insertion technique.
WARNING: In the event that the guidewire and balloon catheter separate during removal, withdraw the guidewire back out the abdomen. Due to its pigtail geometry, feeding a 18G beveled trocar over the existing wire (into the stomach) will straighten the pigtail during removal. Remove guidewire slowly to prevent potential injury. Note that the balloon catheter would be already deflated and removed orally.
WARNING: In the event that the guidewire cannot be retrieved through the trans-abdominal intragastric needle, seek an alternative means for removal of the wire. Do not apply extreme force to remove.
WARNING: In the event that the guidewire and balloon catheter separate during removal, a second attempt with the PUMA-G System should not be tried if the physician decides that either (1) the separation was caused by an undiagnosed abnormal GI anatomy, or (2) additional procedure time would result in an unfavorable risk/benefit profile. In either of these cases, another method of gastrostomy tube placement should be pursued.
Immediately following the procedure, inspect the PUMA-G External Magnet for ultrasound gel, and if present, wipe it off to prevent drying prior to completing cleaning and disinfection steps (described below).
Cleaning & Disinfection
This section includes instructions for manual cleaning and disinfecting the PUMA-G External Magnet (other components of the PUMA-G System are disposable). The external magnet must be cleaned and disinfected after each use, without skipping or shortening steps. Initial cleaning should occur promptly following use, as to minimize potential for drying of contaminants. Based upon the expected usage of the PUMA-G External Magnet, this component is classified as non-critical (per Spaulding classification), meaning that it may come into contact with unbroken skin. The PUMA-G External Magnet may also come into contact with ultrasound gel.
Before cleaning, visually inspect the PUMA-G External Magnet to determine that it is free of any unacceptable deterioration, such as discoloration, pitting, or cracked seals or housing. If damage is evident, discontinue use and contact CoapTech.
WARNING: Use proper safety technique while holding the magnet during cleaning and disinfection. It will attract to nearby metal (ferromagnetic) surfaces.
To clean the PUMA-G External Magnet:
If large amounts of ultrasound gel are present, wipe off using a dry paper towel.
Thoroughly clean all external magnet surfaces using either a soft cloth dampened with cleaner or a premoistened wipe for at least 30 seconds. Water (room temperature from potable water source) or isopropyl alcohol is acceptable. Remove any ultrasound gels or particulate matter. To clean the elastic band holder (the depressed channel around the head of the gray magnet), slide the edge of the cloth or wipe into the gap and press down while moving along this area.
Verify that all gel and particulate matter have been removed. Repeat Step 2, if necessary.
Actively dry the external magnet prior to disinfection steps.
To disinfect the PUMA-G External Magnet:
Thoroughly disinfect all external magnet surfaces using either a soft cloth dampened with a compatible disinfectant or a premoistened disinfectant wipe. An intermediate disinfectant such as PDI Healthcare’s Super Sani-Cloth should be used. Use disinfectant in accordance with its instructions for use. To disinfect the elastic band holder (the depressed ridge area toward the head of the gray magnet), slide the edge of the cloth or wipe into the gap and press down while moving along the ridge.
Following disinfection (according to manufacturer’s instructions), rinse the PUMA-G External Magnet to remove residual disinfectant. Thoroughly rinse all external magnet surfaces using a soft cloth dampened with water (room temperature from potable water source) for at least 30 seconds.
Actively dry the external magnet prior to returning it to its protective case.
After disinfection, visually inspect the PUMA-G External Magnet to determine that it is free of any unacceptable deterioration, such as discoloration, pitting, or cracked seals or housing. If damage is evident, discontinue use and contact CoapTech.
Cleaning and disinfection steps are not expected to impact the useful life of the PUMA-G External Magnet. However, visual inspection for unacceptable deterioration (as described above) would allow for determination on whether the PUMA-G External Magnet’s useful life has been exceeded.
For more information on recommended cleaners, or general questions about cleaning or disinfection steps, please contact CoapTech: by email at cleaning@coaptech.com; by phone at (443) 574-6981; or by visiting www.coaptech.com/keep-it-clean. Please contact CoapTech directly for information on high-level disinfection if required by local or site-specific procedures.